Welcome, Bienvenidos!

Showing posts with label glass mosaic. Show all posts

Hello Florida! Magical Sun Glass Mosaic

Happy Sunday!
I wanted to share photos of a glass mosaic art piece that sold last week. The Magical Sun was purchased by a dear friend and collector of my glass painting.
She has supported my work with kind words and more - her friendship means the world to me!

Here is the mosaic art and where it now lives, in a sweet guest house in Florida. I love the way the light dances on it, catching the beads, mirror and gold highlights in the painted face.
The Magical Sun cheerfully greets everyone in the state of sun and palm trees -
Hello Florida :)


Rich Red Abstract Mosaic

Went glass shopping at Expressions Glass and I am working on this vibrant colored stained glass mosaic. It's large 6' x 2.5' for an exterior pool area. I will be posting stages in the creation of this mosaic from design to completion and installation.

Had to clear out and reorganize the studio, which was a good thing.
In fact, I'll be having a small online studio sale to find loving homes for a few pieces of art in a variety of media :)

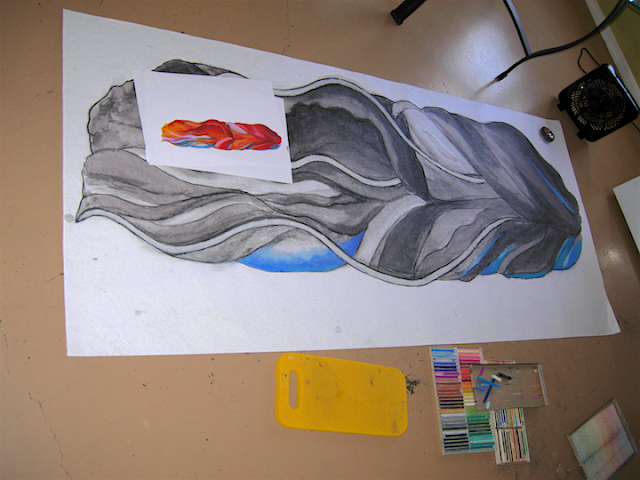
Hand colored full size cartoon, ready to use


Coloring the bulk/Wht banner print out for color matching and because I like to color!
Used an old set of pastels to color the 6' x 2.5' print out.


Original art proposed for pool site. Changed to current curves.


It will be mosaics of stained glass in rich colors inspired by Georgia O' Keefe.
Also, working another mosaic that I am designing for a friend. She will be fabricating it in tile. It's super cool, I love it and will do a separate post for it.


Risa's SoulShine Mosaic Grout Tutorial

A little grouting demonstration for the SoulShine mosaic paper weight memorial of Risa's lovely spirit. Colorful glass bead 'rays', chain, clear glass beads, red iridescent glass adhered onto a small black stone. A fun little student project!


Process:
• After glass and beads have been glued, the adhesive has to completely dry. In our dry climate it's about a day for Weldbond, a couple of days for cement. Weldbond PVC glue was used for this mosaic.

• Painters tape is used to mask around the edge for a nice clean grout line. Small cut pieces overlaid go around the curved shape. The tape also prevents grout from getting on the rest of the stone.


• Black Mapei grout was used with Mapei grout additive in place of water. An eye dropper is used for small work to add liquid because it is more controlled and easier. Walmart has them very cheap.


• As you can see I recycle my paint palettes! The grout is mixed a little thinner than peanut butter to get into all areas easily. Grout is gently smoothed over the mosaic and over the edges of the beads, making sure not to go beyond masked tape.  Then the grout is left to set up about 10 minutes or less.


• A small bit of sponge, container of water and patience is all that's needed to wipe off excess grout to reveal the pretty beads, glass, mirror.
Video link shows how I wipe the grout off carefully, not using too much water. A small towel to blot off the excess water is handy now.


•  Once all of the excess grout has been wiped clean, carefully peel off the masking tape around the edges.

Finished! The grout will continue to harden and set up for a few hours.


Soulshine Mosaic stone

A little Risa's SoulShine mosaic inspiration on stone with glittering beads and red iridescent glass, at the bottom. Came across a dog show today with tri-Aussies. Thought of Risa and this little mosaic came to mind :)

Dogface Butterfly and Monarch Butterfly mosaic stones are colorful companions. Mirror is a favorite material usually included in my mosaics.
The decorative stones make excellent paper weights and doorstops. They also decorate nicely in a landscape design.


Up next, Horned Toad Lizard below. Here is part of the layout and stone. The Horned Toad was supposed to go on a large jewelry box, but I like it on this Large, interesting natural stone below with it's mirror and chain accents.


Gila Dreams Mosaic Signs

This little Gila Welcome mosaic sign is on it's way to Philly to enhance the entry of a Herpetologist's home, where it will make a difference every day.

I'm feeling the itch to mosaic again and make another version of this most favorite subject, the Gila Monster. Another welcome sign or simply the beauty of this unique jewel colored animal.

Mosaic artwork can enhance an outdoor or indoor space as either functional or fine art. The beauty is that the medium of mosaic is very durable, dating back to ancient Roman, Greek with examples of Pompeii being the most known/seen.

Stained glass is my preferred medium, mixed with other glass, natural stones. Here is the same design using rich colors in a re purposed cabinet door with tempered glass.


Commissions for Gila Dream mosaics and welcome signs are available. Each is handmade, unique, made just for you.
Gila Dream - Glass Mosaic, ©SueBetanzos.com

My Morning Walks

Every dawn is an opportunity for new experiences and choices.
I like finding the little pieces of nature. Feathers are the most common prizes along with sightings of amazing birds or scenes.

Inspiration for the Monarch Butterfly came from the subject of migration. It is truly amazing that these powerful fliers travel from the USA to Mexico for the winter. Now all Mexico has to do is keep the forest from being nibbled away, cut down...

Monarch Butterfly Mosaic on Stone 
On this mosaic I redid the antennae - used epoxy instead for a cleaner look :)

Has this ever happened to you?

You have a project you've been working on Way too many hours, trying a new technique.
It's about 11 pm, 95% finished and you're saying to yourself "at last - I'm almost finished - Yay!"
The anticipation, excitement of seeing it completed.

Then a small big setback ...
My studio day is off to a fine start.
Funny thing is last night I was moving this project board to make more room for glass cutting - red glass to finish the border.
This morning the board was bumped and fell over - face first of course.
Cleaning up now and deciding how to make the best of this.  At least the dog glass stayed put :)
Too bad no pics were taken last night to review the "almost" and "so close" Ha ha!


Goldfinch Mosaic

New bird mosaics. A little Goldfinch (siskin) tweeting in the breeze. Some of my neighbors have feeders and I can hear their distinctive calls all day. The males have the dull winter plumage now, but in a couple of months they will start to have their bright yellow breeding colors.

Custom Mosaic Address Plaque - finished!

Glass and ceramic tile custom mosaic address plaque Finished  :)
Below are the steps for reverse indirect technique used in this project.
Address Plaque by  Sue Betanzos Designs

Layout your design with clear contact paper, sticky side up to prevent pieces from moving when placed.

All laid out according to the design. Vermillion Flycatcher with prickly pear and bee.


Firmly apply/adhere mosaic tile tape to the surface. A heavy grade clear tape for mosaics. 


Carefully flip the mosaic. Now the backside is ready for a thin coat of grout and cement. The grout will fill from the back for an even front surface and prevent cement from seeping through.

Butter the substrate (1/2" Wedi board) and a very thin coat on top of the pre-grout. This ensures complete adhesion of all tiles for a firm bond. Vital for outdoor pieces to withstand weather.

Center and Seat the substrate onto the prepped area. This is already on a heavy cardboard bottom. Put another firm board on top to sandwich and flip so now the right side of the mosaic will be on top.

With a tile float, press the tiles to make sure all is bonded. Then let the cement and tile cure a few hours (depending on air moisture/environment).  Use the container the cement was mixed in to test the hardness of the cement as it cures.
When it has hardened to very firm clay, Carefully test a corner of the mosaic film for tile adhesion. The tiles should remain in place.  Gently begin peeling the film at right angle (Not straight up which can pull pieces off since the cement is not hardened).  


Once tile tape has been removed start cleaning excess grout with toothbrush, brushing off excess. The grout should be at the point where it can still be removed from the surface as it begins to harden more.


Certain areas will need more filing if the mosaic is mixed media, such as this one. Plus the edges and bottom still need finishing.


The sides are finished with tile and a touch of silver chain added to the bottom to complement the mirror accents. Last step, grout the edges and the chain, clean and polish. Let it cure for a few days. Cement and grout will continue hardening for 10 - 15 days depending on moisture environment (especially the cement).

This address plaque is ready to hang. It can also be done without hangers for direct permanent application on a surface.
(hangers were applied onto the Wedi board Before mosaic was assembled)

Tucson Wildlife Mosaic Installed

The new and Only wildlife rescue hospital at Tucson Wildlife Center opened earlier this month and the mosaic I did of their logo hangs in the reception entry area. This photo was taken before the grand opening with lots of people.
Mosaic - Tucson Wildlife Center 30" x 30"
The mosaic piece took much longer to complete than anticipated. After a family illness other things seemed to always come up. Then it was damaged during fabrication leading to more time in repairs.

So glad to finally see Wilber the Bobcat mascot logo hanging! It glitters with light and color in the office. Check out Tucson Wildlife's Facebook page for all the latest rescue news. Donate on their TWC website - every donation counts for this non-profit wildlife rescue that runs Entirely on donations.


Below are most of the work in progress steps for those interested in making mosaics. Due to to high detail and many tiny pieces, the Double Reverse Mosaic technique was used to make this mosaic mural. 

• After tracing the logo onto cement board, I cut the hardi backer cement board with an angle grinder.
• The traced logo was hand painted with acrylics like a portrait color study guide to match the glass colors.
• Clear contact paper is cut to the size of the painted board, sticky side up so cut glass mosaic pieces will stick to it and not move or shift. The contact paper is taped to the board edge in 8 places.
• The stained glass is hand selected to match the color references not only to the logo but also to Wilber the bobcat mascot at Tucson Wildlife Center.
• Stained glass is selected and laid out to match the fur growth direction, pattern and color. Then the glass is cut in shapes that match fur texture and color for movement. The grout will be black to help outline the movement and texture of the fur.
• Each piece of glass is hand traced with a sharpie pen, then cut and fitted into place with a glass wheel cutter (favorite tool). Tweezers are used to fit each glass into place.
• The eye is often the most important focal point of an animal portrait and the glass was carefully selected for color and fit based on several reference nature photos.
• Once the mosaic was finished, clear special mosaic tape was applied to the front making sure every tiny piece stuck to the tape. 
• Then the piece was flipped over, the contact paper was peeled off the back and the piece was pre-grouted and wiped so the black grout filled the spaces in the glass. Pre-grouting from the back helps keep the white cement from squeezing up through the front.
• The painted front of the cement board was skimmed with cement mortar and the pre-grouted back of the mosaic was also thinly buttered with the mortar.
• The two pieces were quickly, carefully sandwiched together with the backer board on the bottom, cement adhesive layer, then taped glass mosaic on top.
• Mosaic glass taped surface was carefully tamped with a large float so all layers adhered then left a few days for the cement to cure completely. Then the clear mosaic tape was carefully removed at a flat angle and grout touched up where needed.

Materials & Links: 
Iron frame donation Applby's Ornamental Iron local independent.
Mosaic Tape  Mosaic Supply
Stained glass Expressions Art Glass local independent.
Cement hardi-backer 1/4" board  local Home Depot 
Grout, sanded, black  Custom Grout
Acrylic paints for underpainting FolkArt or Liquitex Basics from local Michaels
Wheeled glass cutters (I had a pair)
Pistol glass cutter (had mine)
Tweezers (have several)
Sharpie permanent fine marker to mark glass
Carbon paper for tracing onto board
Projector (I have an Old one)
Clear contact paper roll
Paper to trace design on from projection if project is too big/heavy to hang on wall.
Angle head grinder for cutting shapes on cement board (messy but WAY less than Wedi board)

This mosaic method is called the double reverse method and is ideal for public art. It provides a super smooth finish and allows the placing of Many tiny detail glass pieces without them shifting and the option of changing pieces. The direct method of gluing down glass as you go is a one shot deal. If pieces don't fit right, it's very difficult to pry up glued tiny glass or fragile pieces.


Original logo

Tracing the logo for the mosaic onto cut hardi-backer board. A projector was used, then any distortion was adjusted.

Stained glass mosaic selections for color match. The logo, other bobcat photos were used for Wilber's face colors.
Cutting mosaic glass and layout matching the underpainting and logo. 

Hand cutting glass mosaic piece by piece

Hand cutting and fitting glass mosaic pieces using a sharpie, wheeled glass cutters and tweezers. The sticky contact paper keeps small pieces from shifting and allows for custom fitting.

Custom fitting glass pieces for glass mosaic and placing on the contact paper.

Custom color match and cut the eye - the "window to the soul" using hand traced paper templates that were then traced onto the selected glass for the eye, nose areas and fitted with tweezers. 


Glass Mosaic about 2/3 finished. 

Mosaic mural for Tucson Wildlife Center ready for grouting.
Last fitting with the iron frame generously donated by Appleby's Ornamental Iron to mark the grout border edges. Appleby's kind owner Ed Hocheder has been running the family owned BBB A+ Appleby since 1980 and is a pleasure to work with.


Half Way There

Almost there. Still have to do the touchy part of  applying clear tile tape to the face, Carefully lift it off, turn it over, Carefully peal off the sticky paper it is on, then Very Carefully apply it to the round substrate that will be prepped with cement thinset.
It's a one shot deal from the time tile tape is applied to the face to the actual finishing. 
This technique is called the Double Reverse application method in mosaics and can be very touchy. I am both nervous and excited - I love challenging techniques.
I chose this method after reading about it in Sonia King's Mosaic Techniques and Traditions and Sandra & Carl Bryant of Showcase Mosaics use this method exclusively for all their public art installations. Their work is beautiful.
They also work in stained glass mosaics and after reading a forum on their technique I decided to use it for this project because of the extreme complexity of design and shading. 
It sure would be nice to have them here for tips - but here I go!
(the black piece of glass by the ear is for lettering, not part of the design)